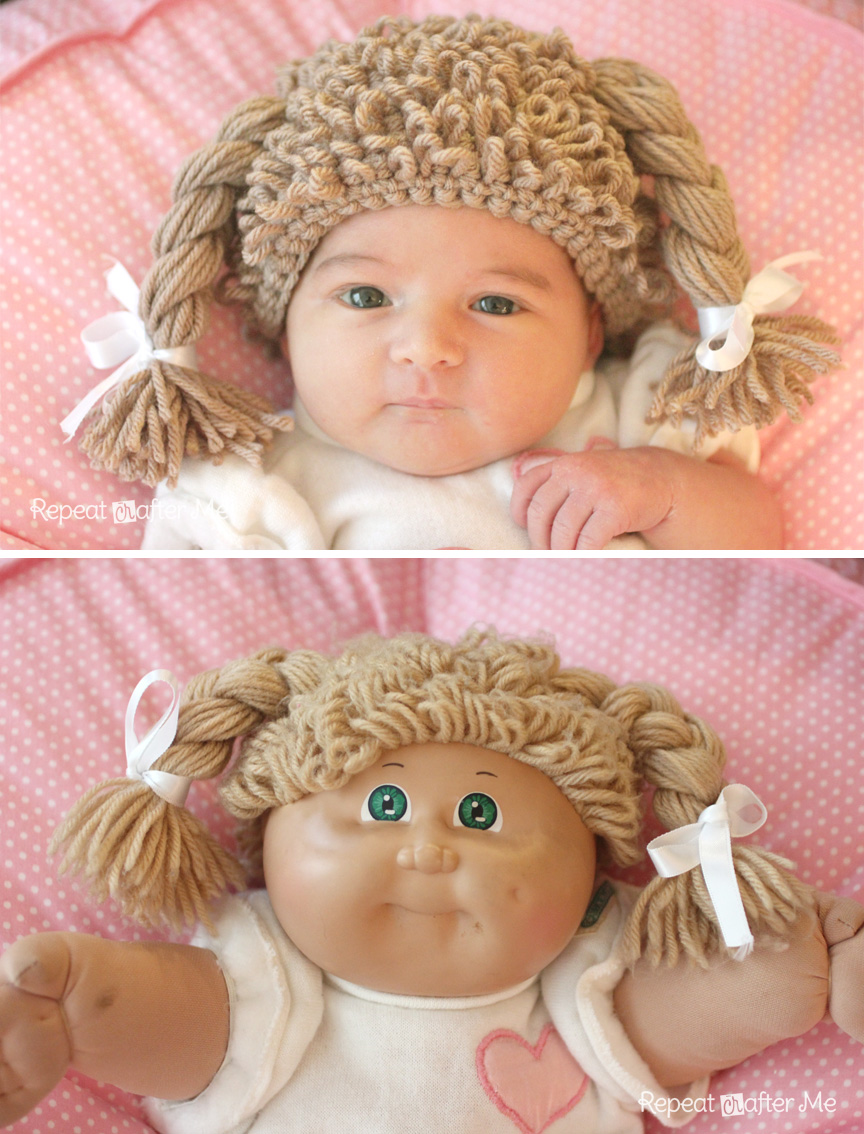
A couple months ago I came across THIScrochetcabbage patch dollhat
pattern. And about the same time my mom found my old cabbage patch doll that she gave me when I was 4 years old! I knew I was going to have to pass the doll down to my newborn daughter AND make her a matching cabbage doll hat. It is perfect for a Halloween costume!
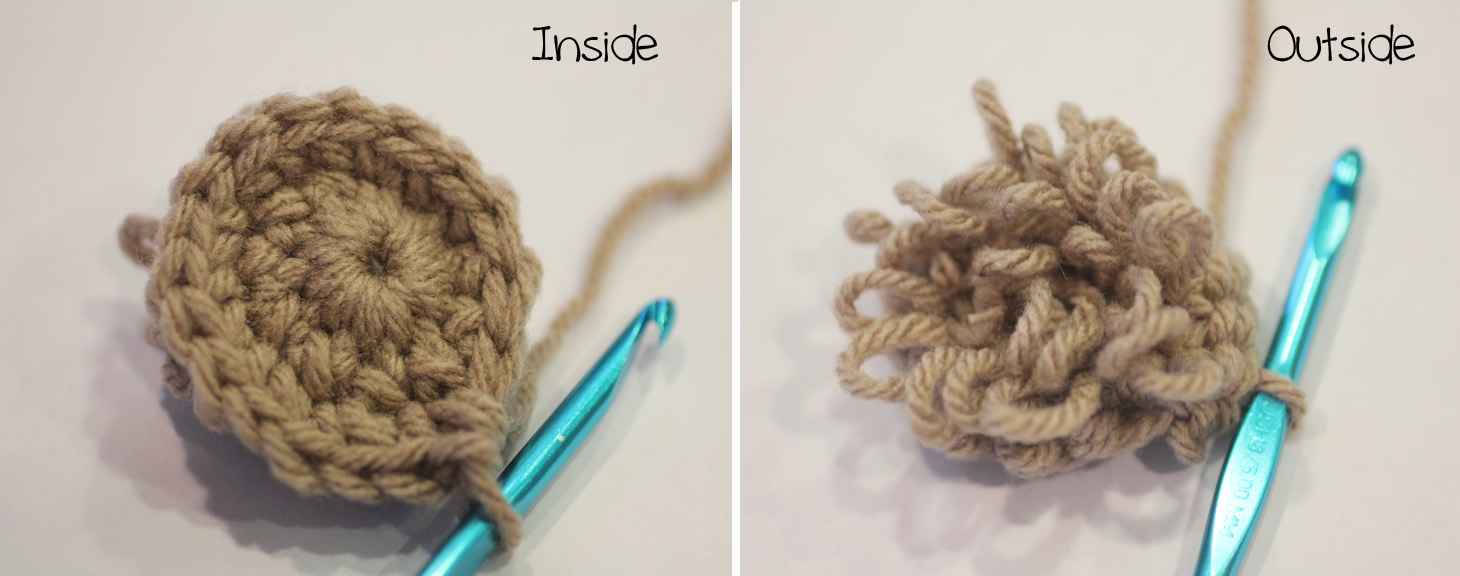
First I need to introduce you to the Loop Stitch. The entire hat will be made with this stitch so if you aren't familiar with it, here is a little tutorial on how to make this stitch:
Step 1: Insert hook in stitch. Step 2: Hook yarn around the backside of both strands of the loop around your finger. Step 3: Pull both strands through stitch. You now have 3 loops on your hook and one large loop sticking out the back of the stitch. Step 4: Adjust your loop by pulling it to be a little smaller (if you want) Step 5: Yarn over and pull through all 3 loops on hook. Step 6: You have completed one Loop Stitch
And here is a little video. I apologize for the poor quality :|
When the hat is complete you will want to flip it inside out so the loops are on the outside.
Abbreviations: Magic Ring Tutorial SC = Single Crochet Lp St = Loop Stitch
Cabbage Patch Doll
Hat Pattern Size: 0-3 Months Magic ring, chain 1, make 11 SC in ring, continue to crochet in rounds Round 2: Make one loop stitch in each stitch around (11 loop stitches) Round 3: 2 Lp St in each stitch around (22 Lp St) Round 4: Lp St in each stitch around (22 Lp St) Round 5: 2 Lp St in first stitch, Lp St in next stitch, repeat around (33 Lp St) Round 6: Lp St in each stitch around (33 Lp St) Round 7: 2 Lp St in first stitch, Lp St in next 2 stitches, repeat around (44 Lp St) Round 8-16: Lp St in each stitch around (44 Lp St) Add more rows if you feel it is needed. I kept mine short so it would sit up higher on her forehead. Fasten off and weave in ends.
I haven't tested larger sizes but this is how I
would increase:
Note: if hat
starts to look skinny/pointy add a row of loop stitches between each increase as
you did in the beginning of the pattern
Magic
ring, chain 1, make 11 SC in ring, continue to crochet in rounds Round 2: Make one loop stitch in each stitch around (11 loop stitches) Round 3: 2 Lp St in each stitch around (22 Lp St) Round 4: Lp St in each stitch around (22 Lp St) Round 5: 2 Lp St in first stitch, Lp St in next stitch, repeat around (33 Lp St) Round 6: Lp St in each stitch around (33 Lp St) Round 7: 2 Lp St in first stitch, Lp St in next 2 stitches, repeat around (44 Lp St) Round 8: 2 Lp St in first stitch, Lp St in next 10, repeat around (48 Lp St) (stop increasing here for 3-6 month size and
continue loop stitch in rounds until you have 17 rows) Round 9: 2 Lp St in first stitch, Lp St in next 11, repeat around (52 Lp St) (stop
increasing here for 6-9 month size and continue loop stitch in rounds until you
have 18 rows) Round 10: 2 Lp St in first, Lp St in next 12, repeat around (56 Lp St) (stop increasing here for 9-12 month size and continue
loop stitch in rounds until you have 19 rows) Round 11: 2 Lp St in first, Lp St in next 13, repeat around (60 Lp St) (stop increasing here for Toddler/Preschooler size and continue loop stitch in
rounds until you have 20 rows) Round 12: 2 Lp St in first, Lp St in next 14, repeat around (64 Lp St) (stop increasing here for Child size
and continue loop stitch in rounds until you have 21 rows) Round
13: 2 Lp St in first, Lp St in next 15, repeat around (68 Lp St) (stop
increasing here for Adult size and continue loop stitch in rounds until you have
22 rows) Feel free to make hat as long or as short as you like. I like to keep mine short so it sits higher up on the forehead.
Braided
Pigtails:
Cut 35 strands of 20 inch long yarn. Fold in half and tie another piece of yarn tightly to the middle point of your yarn strands. Use tapestry needle to sew onto sides of hat. Braid and tie ends with a white ribbon.
*** You may make and sell products from my patterns but if you do I ask that you link back to my post. Please do not copy and post this pattern and claim it as your own. Please do not re-publish photos as your own.***
Want more free patterns? Keep in touch on my Repeat Crafter Me Facebook
Page for new pattern sneak peeks and when they will be available on my blog!
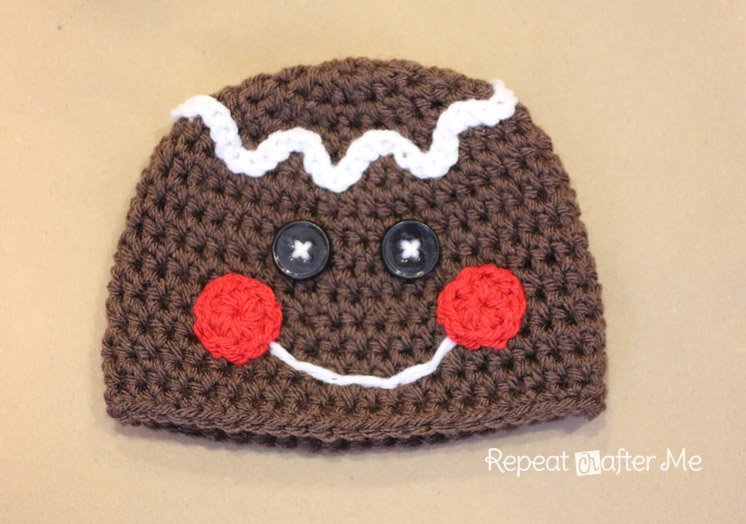
Run, run as fast as you can; You can't catch me, I'm the Gingerbread Man (and Woman)! Make a whole family of gingerbread men with this easy crochetpattern! Just in time for the holiday season and like my other patterns this one is FREE as well!
Materials:
- Vanna's Choice yarn in brown, red and white
- Size I (5.5mm) Crochet Hook
- 2 black buttons
- Tapestry needle
Abreviations:
Magic Ring: You can find a tutorial for the magic ring HERE
Start your rounds in the same stitch as your chain. Join your rounds to the first HDC, NOT the chain. Your last stitch should be in the stitch before your chain.
Here is part 1 of the video
tutorial. It shows how to crochet rounds 1-5 of the
0-3mo size hat. I am still an amateur videographer but hopefully this will help
answer any questions or confusion that you may have. Be sure to check out part 2
of the video tutorial (posted below) which shows how to stitch on the
embellishments.
Gingerbread Man
Crochet Hat
Pattern:
Size: 0-3 months Magic Ring, chain 1, 9 HDC in ring, join, chain 1 Round 2: Work 2 HDC into each st around, join, chain 1 (18 HDC) Round 3: 2 HDC in first stitch, HDC in next, Repeat around, join, chain 1 (27 HDC) Round 4: 2 HDC in first stitch, HDC in next 2, Repeat around, join, chain 1 (36 HDC) Round 5: 2 HDC in first stitch, HDC in next 3, Repeat around, join, chain 1 (45 HDC) Round 6 -13: HDC in each stitch around, join, chain 1 (45 HDC) Round 14: SC in each stitch around, join, fasten off and weave in ends.
Size: 3-6 months Magic Ring, chain 1, 9 HDC in ring, join, chain 1 Round 2: Work 2 HDC into each st around, join, chain 1 (18 HDC) Round 3: 2 HDC in first stitch, HDC in next, Repeat around, join, chain 1 (27 HDC) Round 4: 2 HDC in first stitch, HDC in next 2, Repeat around, join, chain 1 (36 HDC) Round 5: 2 HDC in first stitch, HDC in next 3, Repeat around, join, chain 1 (45 HDC)
Round 6: 2 HDC in first stitch, HDC in next 8, Repeat around, join, chain 1 (50 HDC) Round 7 -14: HDC in each stitch around, join, chain 1 (50 HDC) Round 15: SC in each stitch around, join, fasten off and weave in ends.
Size: 6-12 months Magic Ring, chain 1, 9 HDC in ring, join, chain 1 Round 2: Work 2 HDC into each st around, join, chain 1 (18 HDC) Round 3: 2 HDC in first stitch, HDC in next, Repeat around, join, chain 1 (27 HDC) Round 4: 2 HDC in first stitch, HDC in next 2, Repeat around, join, chain 1 (36 HDC) Round 5: 2 HDC in first stitch, HDC in next 3, Repeat around, join, chain 1 (45 HDC)
Round 6: 2 HDC in first stitch, HDC in next 4, Repeat around, join, chain 1 (54 HDC) Round 7 -15: HDC in each stitch around, join, chain 1 (54 HDC) Round 16: SC in each stitch around, join, fasten off and weave in ends.
Size: Toddler/Preschooler Magic Ring, chain 1, 9 HDC in ring, join, chain 1 Round 2: Work 2 HDC into each st around, join, chain 1 (18 HDC) Round 3: 2 HDC in first stitch, HDC in next, Repeat around, join, chain 1 (27 HDC) Round 4: 2 HDC in first stitch, HDC in next 2, Repeat around, join, chain 1 (36 HDC) Round 5: 2 HDC in first stitch, HDC in next 3, Repeat around, join, chain 1 (45 HDC)
Round 6: 2 HDC in first stitch, HDC in next 4, Repeat around, join, chain 1 (54 HDC)
Round 7: HDC around, join, chain 1 (54 HDC
Round 8: 2 HDC in first stitch, HDC in next 8, Repeat around (60 HDC) Round 9 -16: HDC in each stitch around, join, chain 1 (60 HDC) Round 17: SC in each stitch around, join, fasten off and weave in ends.
Size: Child Magic Ring, chain 1, 9 HDC in ring, join, chain 1 Round 2: Work 2 HDC into each st around, join, chain 1 (18 HDC) Round 3: 2 HDC in first stitch, HDC in next, Repeat around, join, chain 1 (27 HDC) Round 4: 2 HDC in first stitch, HDC in next 2, Repeat around, join, chain 1 (36 HDC) Round 5: 2 HDC in first stitch, HDC in next 3, Repeat around, join, chain 1 (45 HDC)
Round 6: 2 HDC in first stitch, HDC in next 4, Repeat around, join, chain 1 (54 HDC)
Round 7: HDC around, join, chain 1 (54 HDC
Round 8: 2 HDC in first stitch, HDC in next 8, Repeat around (60 HDC)
Round 9: 2 HDC in first stitch, HDC in next 29, Repeat around, join, chain 1 (62 HDC) Round 10 -18: HDC in each stitch around, join, chain 1 (62 HDC) Round 19: SC in each stitch around, join, fasten off and weave in ends.
Size: Adult Magic Ring, chain 1, 9 HDC in ring, join, chain 1 Round 2: Work 2 HDC into each st around, join, chain 1 (18 HDC) Round 3: 2 HDC in first stitch, HDC in next, Repeat around, join, chain 1 (27 HDC) Round 4: 2 HDC in first stitch, HDC in next 2, Repeat around, join, chain 1 (36 HDC) Round 5: 2 HDC in first stitch, HDC in next 3, Repeat around, join, chain 1 (45 HDC)
Round 6: 2 HDC in first stitch, HDC in next 4, Repeat around, join, chain 1 (54 HDC)
Round 7: HDC around, join, chain 1 (54 HDC
Round 8: 2 HDC in first stitch, HDC in next 8, Repeat around (60 HDC)
Round 9: 2 HDC in first stitch, HDC in next 9, Repeat around, join, chain 1 (66 HDC) Round 10 -19: HDC in each stitch around, join, chain 1 (66 HDC) Round 20: SC in each stitch around, join, fasten off and weave in ends.
Here is part 2 of the video tutorial that explains how to make
the "icing," cheeks, and mouth embellishments on the hat.
Gingerbread Cheeks:
With red yarn...
Magic
Ring, chain 1, make 10 HDC inside of ring, join to first HDC, fasten off leaving tail to sew onto hat.
Gingerbread Icing:
You will want make a long series of chain and stitch them on in a wave around the hat.
For the 0-3 month size hat I chained 70 and stitched the
chain on between rounds 4 and 5. You will want to make longer chains for the larger hats.
Gingerbread Leggings:
I haven't figured out a good way to calculate size for these. You will want to measure the child's leg before beginning so you know how many chains to make.
The ones pictured are too small for my 19 month old. I think they would fit a 6-12 month old. You can increase/decrease the beginning chain to make larger/smaller leggings.
Here is the pattern I used:
Chain 20, join to beginning of chain with a slip stitch, chain 1
Round 1-11: HDC in each stitch around, join, chain 1
Round 12: SC in each stitch around, join, fasten off and weave in ends.
With white yarn, chain 14 and stitch on to create "icing."
Gingerbread Woman Bow:
Chain 10, SC in second chain from hook and the rest of the way down chain, chain 1, turn
Row 2-4, SC across, chain 1, turn
at the end of row 4, continue to SC around the edges, join to first SC, fasten off and weave in ends.
Wrap yarn around the middle of the bow, tie off tightly and attach to hat.
Disclaimer: I have not had anyone but myself test these
patterns. Nor have I had the opportunity to have children and adults with different
head sizes try on these hats. Please be my testers! And please refrain from
negative comments. If you don't like how I've written the
pattern, don't use it. I am sharing it with you for
free and hope to inspire you with new
ideas and patterns.
*** You may make and sell
products from my patterns but if you do I ask that you
link back to my post. Please do not copy and post this
pattern and claim it as your own. Please do not re-publish photos as your
own.***
Want
more free patterns? Keep in touch on my Repeat Crafter Me Facebook
Page for new pattern sneak peeks and when they
will be available on my blog!
I decided I wanted to make a mobile for my
baby girls room. I thought some sweet little lambs would be nice and crochet was
the way to go about making them. Unfortunately these little lambs took a little
longer to crochet and put together than I thought they would. But if you are up for a project than this is
the one for you! Of course you could always just make the lambs and leave them
as little stuffed animals. They
are about 5 inches long.
First lets start with the crochet pattern:
Materials: - Worsted weight yarn in cream, brown, gray or any color of your choice. I also think a pink or blue lamb would be nice for a baby room. - Furry Yarn. I used Bernat Pipsqueak in
Whitey White - Size H crochet hook. - Tapestry needle - Small safety eyes - Stitch marker - Poly-fil stuffing
Abbreviations: Magic Ring Tutorial SC = Single Crochet SC Decrease = Single Crochet Decrease
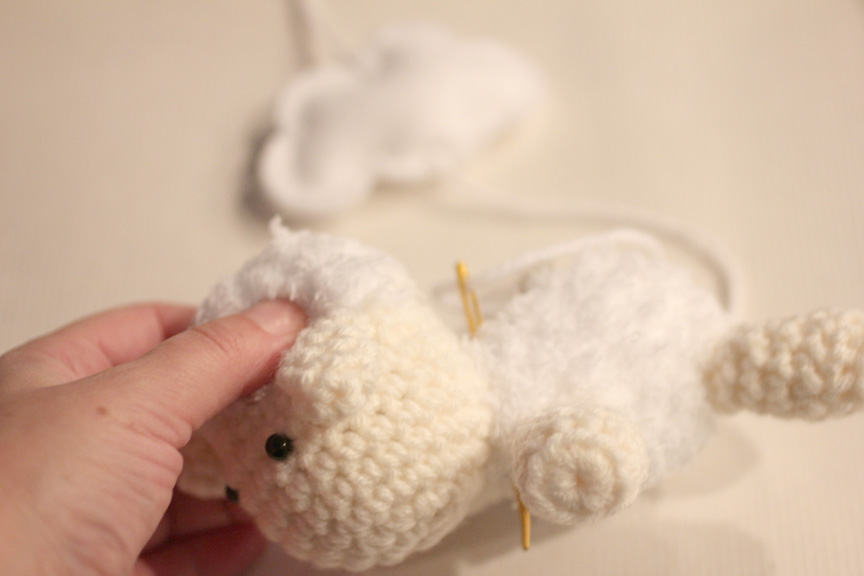
Head: With worsted weight
yarn.. Magic Ring, chain 1, SC 8 inside ring, do not join, continue to SC in rounds (use stitch
marker to mark your rounds) Round 2: 2 SC in each stitch around (16 SC) Round 3: 2 SC in first stitch, SC in next, repeat around (24 SC) Round 4-8: SC in each stitch around (24 SC) Round 9: SC decrease, SC in next, repeat around (you should now have 16 SC) Change to furry yarn... Round 10: SC in each stitch around (16 SC) Round 11: SC decrease until closed. Be sure to stuff and add safety eyes before fully closing!!
Ears: Chain 4, SC in second chain from hook, SC in next 2. Now working on other side of chain, SC in next 3, do not join, continue to SC in rounds Round 2-4: SC in each stitch around (6 SC) Round 5: SC decrease or stitch closed. Sew onto head where furry yarn meets worsted yarn.
Body: NOTE: Body is worked with furry yarn. It is pretty much
impossible to keep track of your stitches with this yarn. Do the best you can.
If you are off by one or more stitches, that is ok.
You won't be able to see the flaws! With furry yarn... Magic ring, chain 1, 8 SC in ring, do not join, continue to SC in rounds. Use stitch marker to mark your rounds. Round 2: 2 SC in each stitch around (16 SC) Round 3-6: SC in each stitch around (16 SC) Round 7: SC decrease in first, SC in next Stuff with poly-fil Round 8: SC decrease until closed Leave tail to sew onto head.
Feet: Magic Ring, chain 1 in ring, make 10 SC in ring, continue to SC in rounds. Round 2: In back loops only, SC in each stitch around (10 SC) Round 3-4: Working in both loops, SC in each stitch around (10 SC) Round 5: SC decrease, SC in next 3 stitches, repeat around Round 6: SC decrease, SC in next 2, repeat around Stuff and sew onto body.
Now lets put together the mobile!
- I used the inside of an 8" wooden embroidery hoop and painted it white. - Darice
White Picket Fence (which I found at Jo-Ann Fabrics but if you google it you can purchase it online from multiple places). I had to buy two since one is too short to fit around the entire hoop. - White worsted
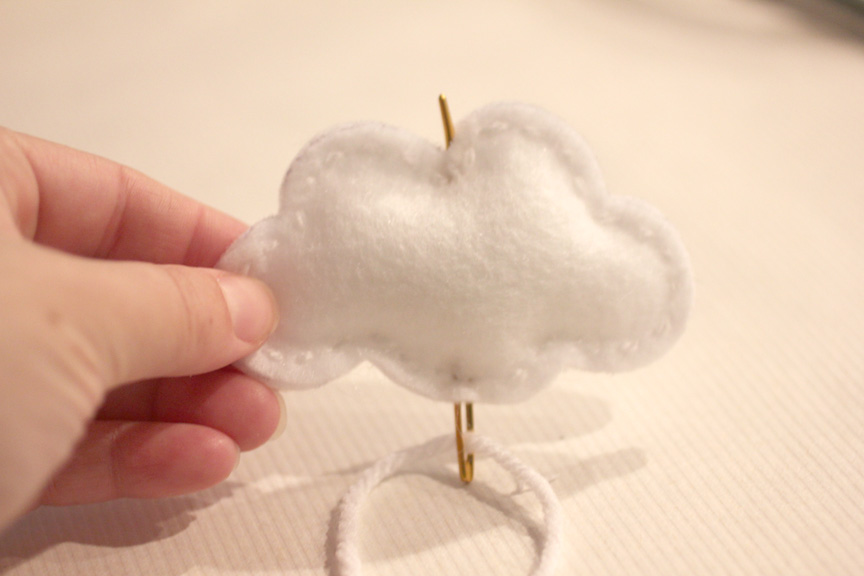
weight yarn to string everything together - 3 white clouds which I cut out from felt (you will need to cut 6 clouds, lightly stuffed with poly-fil and stitched around the edge with 2-ply yarn and a tapestry
needle). I used THIS as my template for the clouds. - And my crochet lambs.
First thing you will want to do is cut a long piece of worsted weight yarn and string it through the cloud and crochet lamb. Use a tapestry
needle to send the yarn up the middle of the cloud and then through the body of the lamb (near the neck). Now loop your yarn back up the bottom of the lamb and make a knot. You can weave it through again to make sure it is tightly secured to the crochet lamb.
Tie the yarn onto your painted embroidery hoop. Hopefully you still have a long end left that will tie together with your other two strings and attach to a hook from the ceiling. If your yarn isn't long enough, just tie on a second string so that you will be able to hang it. You will want to repeat this entire process with all three of your lambs/clouds and place them evenly around your hoop.
Now hot glue your white picket fence over the outer edge of the embroidery hoop and over the yarn that you have tied on.
Tie the strings together and hang from a cup hook in your ceiling.
Disclaimer: Please use extreme caution if placing this over a
crib. Make sure all your pieces are secure. In fact, I decided to place mine in
the corner of the room near the changing table. I don't trust this craft to be a
safe object to place over the baby's crib.
***
You may make and sell products from my patterns but if you do I ask that you
link back to my post. Please do not copy and post this pattern and claim it as
your own. Please do not re-publish photos as your own.*** Want
more free patterns? Keep in touch on my Repeat Crafter Me Facebook
Page for
new pattern sneak peeks and when they will be available on my blog!
1 ball Lily® Sugar ’n Cream yarn in
Cornflower Blue (A)
1 ball Lily® Sugar ’n Cream yarn in Hot
Orange (B)
1 ball Lily® Sugar ’n Cream yarn in Sage
Green (C)
1 ball Lily® Sugar ’n Cream yarn in Rose
Pink (D)
1 ball Lily® Sugar ’n Cream yarn in Warm
Brown (E)
1 ball Lily® Sugar ’n Cream yarn in Jute
(F)
3.5 mm (U.S. E or 4) crochet hook or size
needed to obtain gauge
Stuffing
Gauge: 16 sc and 20 rows = 4 ins [10 cm]
Instructions:
Body
With MC, ch 2.
**1st rnd: 7 sc in 2nd ch from hook. Join
with sl st in first sc.
2nd rnd: Ch 1. 2 sc in each sc around.
Join with sl st in first sc. 14 sc.
3rd rnd: Ch 1. 1 sc in same sp as last sl
st. *2 sc in next sc. 1 sc in next sc. Rep from * to last sc. 2 sc in next sc.
Join with sl st in first sc. 21 sc.
4th rnd: Ch 1. 1 sc in same sp as last sl
st. *2 sc in next sc. 1 sc in each of next 2 sc. Rep from * to last 2 sc. 2 sc
in next sc. 1 sc in next sc. Join with sl st in first sc. 28 sc.
5th rnd: Ch 1. 1 sc in same sp as last sl
st. *2 sc in next sc. 1 sc in each of next 3 sc. Rep from * to last 3 sc. 2 sc
in next sc. 1 sc in each of next 2 sc. Join with sl st in first sc. 35 sc.
6th rnd: Ch 1. 1 sc in same sp as last sl
st. *2 sc in next sc. 1 sc in each of next 4 sc. Rep from * to last 4 sc. 2 sc
in next sc. 1 sc in each of next 3 sc. Join with sl st in first sc. 42 sc.
7th rnd: Ch 1. 1 sc in same sp as last sl
st. *2 sc in next sc. 1 sc in each of next 5 sc. Rep from * to last 5 sc. 2 sc
in next sc. 1 sc in each of next 4 sc. Join with sl st in first sc. 49 sc.**
8th to 11th rnds: Ch 1. 1 sc in same sp
as last sl st and each sc around. Join with sl st in first sc.
12th rnd: Ch 1. 1 sc in same sp as last
sl st. *Draw up a loop in each of next 2 sc. Yoh and draw through 3 loops on
hook - Sc2tog made. 1 sc in each of next 5 sc. Rep from * to last 6 sc. Sc2tog
over next 2 sts. 1 sc in each of next 4 sc. Join with sl st in first sc. 42
sts.
13th to 16th rnds: Ch 1. 1 sc in same sp
as last sl st and each st around. Join with sl st in first sc.
17th rnd: Ch 1. 1 sc in same sp as last
sl st. *Sc2tog over next 2 sc. 1 sc in each of next 4 sc. Rep from * to last 5
sc. Sc2tog over next 2 sc. 1 sc in each of next 3 sc. Join with sl st in first
sc. 35 sts.
18th to 21st rnds: Ch 1. 1 sc in same sp
as last sl st and each sc around. Join with sl st in first sc.
22nd rnd: Ch 1. 1 sc in same sp as last
sl st. *Sc2tog over next 2 sc. 1 sc in each of next 3 sc. Rep from * to last 4
sc. Sc2tog over next 2 sc. 1 sc in each of next 2 sc. Join with sl st in first
sc. 28 sts.
23rd to 26th rnds: Ch 1. 1 sc in same sp
as last sl st and each sc around. Join with sl st in first sc. Fasten off.
Head
Work from ** to ** as given for Body.
8th rnd: Ch 1. 1 sc in same sp as last sl
st. *2 sc in next sc. 1 sc in each of next 6 sc. Rep from * to last 6 sc. 2 sc
in next sc. 1 sc in each of next 5 sc. Join with sl st in first sc. 56 sc.
9th rnd: Ch 1. 1 sc in same sp as last sl
st. *2 sc in next sc. 1 sc in each of next 7 sc. Rep from * to last 7 sc. 2 sc
in next sc. 1 sc in each of next 6 sc. Join with sl st in first sc. 63 sc.
10th rnd: Ch 1. 1 sc in same sp as last
sl st. *2 sc in next sc. 1 sc in each of next 8 sc. Rep from * to last 8 sc. 2
sc in next sc. 1 sc in each of next 7 sc. Join with sl st in first sc. 70 sc.
11th rnd: Ch 1. 1 sc in same sp as last
sl st. *2 sc in next sc. 1 sc in each of next 9 sc. Rep from * to last 9 sc. 2
sc in next sc. 1 sc in each of next 8 sc. Join with sl st in first sc. 77 sc.
12th to 16th rnds: Ch 1. 1 sc in same sp
as last sl st and each sc around. Join with sl st in first sc.
17th rnd: Ch 1. 1 sc in same sp as last
sl st. *Sc2tog over next 2 sts. 1 sc in each of next 9 sc. Rep from * to last 10
sc. Sc2tog over next 2 sts. 1 sc in each of next 8 sc. Join with sl st in first
sc. 70 sts.
18th rnd: Ch 1. 1 sc in same sp as last
sl st. 1 sc in each of next 4 sc. *Sc2tog over next 2 sts. 1 sc in each of next
8 sc. Rep from * to last 5 sc. Sc2tog over next 2 sts. 1 sc in each of next 3
sc. Join with sl st in first sc. 63 sts.
19th rnd: Ch 1. 1 sc in same sp as last
sl st. *Sc2tog over next 2 sts. 1 sc in each of next 7 sts. Rep from * to last 8
sts. Sc2tog over next 2 sts. 1 sc in each of next 6 sts. Join with sl st in
first sc. 56 sts.
20th rnd: Ch 1. 1 sc in same sp as last
sl st. 1 sc in each of next 3 sts. *Sc2tog over next 2 sts. 1 sc in each of next
6 sts. Rep from * to last 4 sts. Sc2tog over next 2 sts. 1 sc in each of next 2
sc. Join with sl st in first sc. 49 sts.
21st rnd: Ch 1. 1 sc in same sp as last
sl st. *Sc2tog over next 2 sts. 1 sc in each of next 5 sts. Rep from * to last 6
sts. Sc2tog over next 2 sts. 1 sc in each of next 4 sts. Join with sl st in
first sc. 42 sts.
22nd rnd: Ch 1. 1 sc in same sp as last
sl st. 1 sc in each of next 2 sts. *Sc2tog over next 2 sts. 1 sc in each of next
4 sts. Rep from * to last 3 sts. Sc2tog over next 2 sts. 1 sc in last sc. Join
with sl st in first sc. 35 sts.
23rd rnd: Ch 1. 1 sc in same sp as last
sl st. *Sc2tog over next 2 sts. 1 sc in each of next 3 sts. Rep from * to last 4
sts. Sc2tog over next 2 sts. 1 sc in each of next 2 sts. Join with sl st in
first sc. 28 sts.
24th rnd: Ch 1. 1 sc in same sp as last
sl st. 1 sc in next st. *Sc2tog over next 2 sts. 1 sc in each of next 2 sts. Rep
from * to last 2 sts. Sc2tog over last 2 sts. Join with sl st in first sc. 21
sts. Fasten off.
Arm
(Make 2)
With A, ch 2.
1st rnd: 6 sc in 2nd ch from hook. Join
with sl st in first sc.
2nd rnd: Ch 1. 2 sc in each sc around.
Join with sl st in first sc. 12 sc.
3rd rnd: Ch 1. 1 sc in same sp as last sl
st and each sc around. Join with sl st in first sc.
Rep last rnd twice more, joining MC at
end of last rnd.
With MC, rep last rnd 12 times more.
Fasten off.
Ear
(Make 2)
With MC, ch 2.
1st rnd: 7 sc in 2nd ch from hook. Join
with sl st in first sc.
2nd rnd: Ch 1. 2 sc in each sc around.
Join with sl st in first sc. 14 sc.
3rd rnd: Ch 1. 1 sc in same sp as last sl
st. *2 sc in next sc. 1 sc in next sc. Rep from * to last sc. 2 sc in next sc.
Join with sl st in first sc. 21 sc.
4th rnd: Ch 1. 1 sc in same sp as last sl
st and each sc around. Join with sl st in first sc.
Rep last rnd 13 times more. Fasten off.
Ear
Inserts (Make 2)
With D, ch 10.
1st row: 1 sc in 2nd ch from hook. 1 sc
in each ch to last ch. 3 sc in last ch. Do not turn. Working in opposite side of
ch, proceed as follows: 1 sc in each rem loop to end of ch. Fasten off.
Sew Inserts to Ears as illustrated.
Leg
(Make 2)
With A, ch 2.
1st rnd: 8 sc in 2nd ch from hook. Join
with sl st in first sc.
2nd rnd: Ch 1. 2 sc in each sc around.
Join with sl st in first sc. 16 sc.
3rd rnd: Ch 1. 1 sc in same sp as last sl
st. 1 sc in each sc around. Join with sl st in first sc.
Rep last rnd twice more, joining MC at
end of last rnd.
With MC, rep last rnd 11 times more.
Fasten off.
Tail
With MC, ch 2.
1st rnd: 6 sc in 2nd ch from hook. Join
with sl st in first sc.
2nd rnd: Ch 1. 2 sc in each sc around.
Join with sl st in first sc. 12 sc.
3rd rnd: Ch 1. 1 sc in same sp as last sl
st. *2 sc in next sc. 1 sc in next sc. Rep from * to last sc. 2 sc in next sc.
Join with sl st in first sc. 18 sc.
4th to 6th rnds: Ch 1. 1 sc in same sp as
last sl st and each sc around. Join with sl st in first sc.
2nd row: 2 sc in first sc. 2 sc in next
sc. Ch 1. Turn. 4 sc.
3rd row: 2 sc in first sc. 1 sc in each
of next 2 sc. 2 sc in last sc. Ch 1. Turn. 6 sc.
4th row: 1 sc in each sc to end of row.
Ch 1. Turn.
5th row: Sc2tog over first 2 sc. 1 sc in
each of next 2 sc. Sc2tog over last 2 sc. Ch 1. Turn. 4 sts.
6th row: (Sc2tog) twice. Turn.
Rep 2nd to 6th rows once more. Fasten
off.
Nose
With E, ch 2.
1st rnd: 6 sc in 2nd ch from hook. Join
with sl st to first sc. Fasten off.
Finishing
Stuff Body, Head, Arms, Legs and sew tog
as illustrated. Sew Cheeks in position, placing stuffing as you sew. Sew on
Nose. With E and F, embroider Eyes. With D embroider Mouth
Cut 2 strands of E and 1 strand of MC 7
ins [18 cm] long and thread through Cheeks for whiskers.
Stuff Tail and sew in position.
Carrot
With B, ch 2.
1st rnd: 8 sc in 2nd ch from hook. Join
with sl st in first sc.
2nd rnd: Ch 1. 2 sc in each sc around.
Join with sl st in first sc. 16 sc.
3rd and 4th rnds: Ch 1. 1 sc in same sp
as last sl st. 1 sc in each sc around. Join with sl st in first sc.
5th rnd: Ch 1. 1 sc in same sp as last sl
st. (Sc2tog over next 2 sc. 1 sc in each of next 3 sc) 3 times. Join with sl st
in first sc. 13 sts.
6th and 7th rnds: Ch 1. 1 sc in same sp
as last sl st. 1 sc in each st around. Join with sl st in first sc.
8th rnd: Ch 1. 1 sc in same sp as last sl
st. (Sc2tog over next 2 sts. 1 sc in each of next 2 sc) 3 times. Join with sl st
in first sc. 10 sts.
9th to 11th rnds: Ch 1. 1 sc in same sp
as last sl st and each st around. Join with sl st in first sc.
12th rnd: Ch 1. 1 sc in same sp as last
sl st. (Sc2tog over next 2 sc. 1 sc in next sc) 3 times. Join with sl st in
first sc. 7 sc.
13th rnd: Ch 1. 1 sc in same sp as last
sl st and each st around. Join with sl st in first sc.
14th rnd: Ch 1. 1 sc in same sp as last
sl st. (Sc2tog over next 2 sts) 3 times. Join with sl st in first sc. 4 sts.
Fasten off.
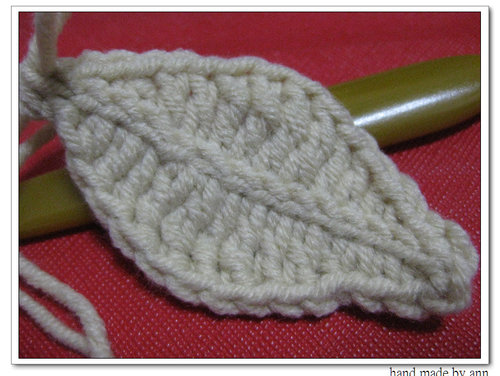
Leaves (Make 3)
With C, ch 12.
1st row: 1 sc in 2nd ch from hook. 1 sc
in each of next 3 ch. 1 hdc in each of next 3 ch. 1 dc in each of last 4 ch.
Fasten off.
Sew on Leaves to top of Carrot. Sew
Carrot to arm as illustrated.
Necktie
With A, ch 4.
1st row: 4 dc in 4th ch from hook. Turn.
5 dc.
2nd row: Ch 3 (counts as dc). 1 dc in
first dc. 1 dc in each of next 3 dc. 2 dc in last dc. Turn. 7 dc.
3rd row: Ch 3 (counts as dc). Miss next
dc. 1 dc in each of next 3 dc. Miss next dc. 1 dc in last dc. Ch 2. Turn. 5
dc.
4th row: Ch 2. 1 hdc in each dc to end of
row. Turn.
5th row: Ch 2. 1 hdc in each hdc to end
of row. Turn.
Rep last row until work from beg measures
10 ins [25.5 cm]. Fasten off.
RED HEART “Super Saver”: 1 Skein each 313 Aran A, 334 Buff B, 400 Grey Heather C, 505 Aruba Sea D, 319 Cherry Red E, 312 Black F, 256 Carrot G.
Crochet Hook: 3.75mm [US F-5].
Split-ring stitch marker
Stuffing
Yarn needle
Black embroidery floss
Embroidery needle
3 ¼” black
Buttons
4 ¼” red buttons
Red crayon.
Instructions:
SNOWMAN Head & Body With A, ch 2.
Round 1: 6 sc in 2nd ch from hook – 6 sts.
Round 2: 2 sc in each st around – 12 sts.
Round 3: * Sc in next st, 2 sc in next st; repeat from * around – 18 sts.
Rounds 4-7: Sc in each st around.
Round 8: *Sc2tog; repeat from * around – 9 sts.
Round 9: 2 sc in each st around – 18 sts.
Round 10: * Sc in next 2 sts, 2 sc in next st; repeat from * around – 24 sts.
Rounds 11-14: Sc in each st around.
Round 15: *Sc2tog; repeat from * around – 12 sts.
Round 16: 2 sc in each st around – 24 sts.
Round 17: * Sc in next 3 sts, 2 sc in next st; repeat from * around – 30 sts.
Rounds 18-22: Sc in each st around.
Round 23: *Sc2tog; repeat from * around – 15 sts. Add stuffing.
Round 24: Sc in next st, [sc2tog] 7 times – 8 sts. Fasten off leaving a long tail. Weave tail through remaining sts and draw tight.
Carrot Nose With G, ch 3.
Row 1: Sc in 2nd ch from hook, dc in next ch. Fasten off, leaving long tail for sewing.
Hat With F, ch 2.
Rounds 1-3: Work same as Head & Body Rounds 1-3 – 18 sts.
Round 4: Working in back loops only, sc in each st around.
Rounds 5-7: Sc in each st around.
Round 8: Working in front loops only, 2 hdc in each st around – 36 sts. Fasten off.
Finishing
Sew Carrot Nose in half and sew into place on Snowman’s face.
Embroider eyes according to picture.
Sew buttons in place.
Sew Hat on Head.
Weave in ends.
BOY Head & Body With B, ch 2.
Rounds 1-8: Work same as Snowman Head & Body Rounds 1-8 – 9 sts.
Round 9: Sc in each st around.
Round 10: 2 sc in each st around – 18 sts.
Round 11: Sc in each st around.
Round 12: Repeat Round 11; change to C.
Round 13: With C, sc in each st around.
Rounds 14-16: Sc in each st around. Add stuffing.
Round 17: Working in back loops only, * sc in next st, sc2tog; repeat from * around – 12 sts.
Round 18: * Sc2tog; repeat from * around – 6 sts. Fasten off; draw remaining sts together.
Legs (Make 2) With E, ch 2.
Round 1: 6 sc in 2nd ch from hook – 6 sts.
Round 2: 2 sc in each st around – 12 sts.
Round 3: Sc in next 5 sts, [2 sc in next st] 2 times; sc in next 5 sts – 14 sts.
Round 4: Working in back loops only, sc in each st around.
Round 5: Sc in next 5 sts, [sc2tog] 2 times; sc in next 5 sts – 12 sts.
Round 6: * Sc in next st, sc2tog; repeat from * around – 8 sts.
Round 7: Sc in each st around.
Round 8: Working in front loops only, * sc in next st, 2 sc in next st; repeat from * around; change to C – 12 sts.
Round 9: With C, working in unused back loops of Round 7, sc in each st around – 8 sts.
Round 10: Sc in each st around. Fasten off. Add stuffing.
Turn up cuff of boot.
Coat With D, ch 13.
Row 1: Sc in 2nd ch from hook and in each ch across; turn – 12 sts.
Row 2: Ch 1, sc in 1st st, 2 sc in next st, * sc in next st, 2 sc in next st; repeat from * across; turn – 18 sts.
Row 3: Ch 1, sc in 1st 5 sts, 2 sc in next st, * sc in next 5 sts, 2 sc in next st; repeat from * across; turn – 21 sts.
Rows 4-8: Ch 1, sc in each st across; turn. Fasten off at end of Row 8.
Collar With A, ch 15.
Row 1: Sc in 2nd ch from hook and in each ch across – 14 sts. Fasten off.
Coat Panel With D, ch 9.
Row 1: Hdc in 2nd ch from hook and in each ch across – 8 sts. Fasten off.
Arms (Make 2) With D, ch 2.
Round 1: 6 sc in 2nd ch from hook – 6 sts.
Round 2: * Sc in next st, 2 sc in next st; repeat from * around – 9 sts.
Rounds 3-7: Sc in each st around. Fasten off D at end of Round 7.
Round 8: Join E in back loop of any st, ch 1, sc in back loop only of each st around.
Rounds 9-10: Sc in each st around. At end of Round 10, add stuffing, fasten off and draw remaining sts together.
Cuff-Round 11:
Join A in any unused loop of Round 7, ch 1, sc in front loop only of each st around; join with a slip st. Fasten off.
Thumbs (Make 2) With E, ch 2.
Row 1: Dc in 2nd ch from hook. Fasten off. Fold in half and sew in place.
Hat With C, ch 2.
Rounds 1-3: Work same as Snowman Head & Body Rounds 1-3: change to D at end of Round 3 – 18 sts.
Round 4: With D, * sc in next 2 sts, 2 sc in next st; repeat from * around – 24 sts.
Round 5: Sc in each st around; change to C.
Round 6: Sc in next 3 sts, * (sc, ch 1, hdc) all in next st, dc in next 2 sts, (hdc, ch 1, sc) all in next st, ** sc in next 10 sts; repeat from * to **; sc in next 3 sts. Fasten off.
Finishing
Sew Hat in place.
Embroider face referring to photo.
Color cheeks with red crayon.
Sew Legs in place.
Wrap Coat around Body with opening in front; sew opening closed.
Sew Coat Panel over opening; sew buttons in place. Sew Collar around neck.
Sew Arms to Coat referring to photo.
Tack Boy and Snowman together referring to photo.
Notes:
Snowman & Boy are 6¼” tall.
GAUGE: 16 sc = 4”; 16 rounds = 4”. CHECK YOUR GAUGE. Use any
size hook to obtain the gauge.
To Change Color: Work last st of row until 2 loops are left on hook, drop old color, yo with new color and complete stitch. Fasten off old color.
Do not join rounds; instead, place marker in first st of round and move up as work progresses.
Abbreviations:
Sc2tog = [draw up a loop in next st] twice, yo and draw through all 3 loops on hook.
A, B, C = Color A, Color B, Color C, etc
ch = chain
dc = double crochet
hdc = half double crochet
mm = millimeters
sc = single crochet
st(s) = stitch(es)
yo = yarn over
[ ] = work directions in brackets the number of times specified
* or ** = repeat whatever follows the * or ** as indicated.