Crochet Cabbage Patch Doll
Inspired Hat
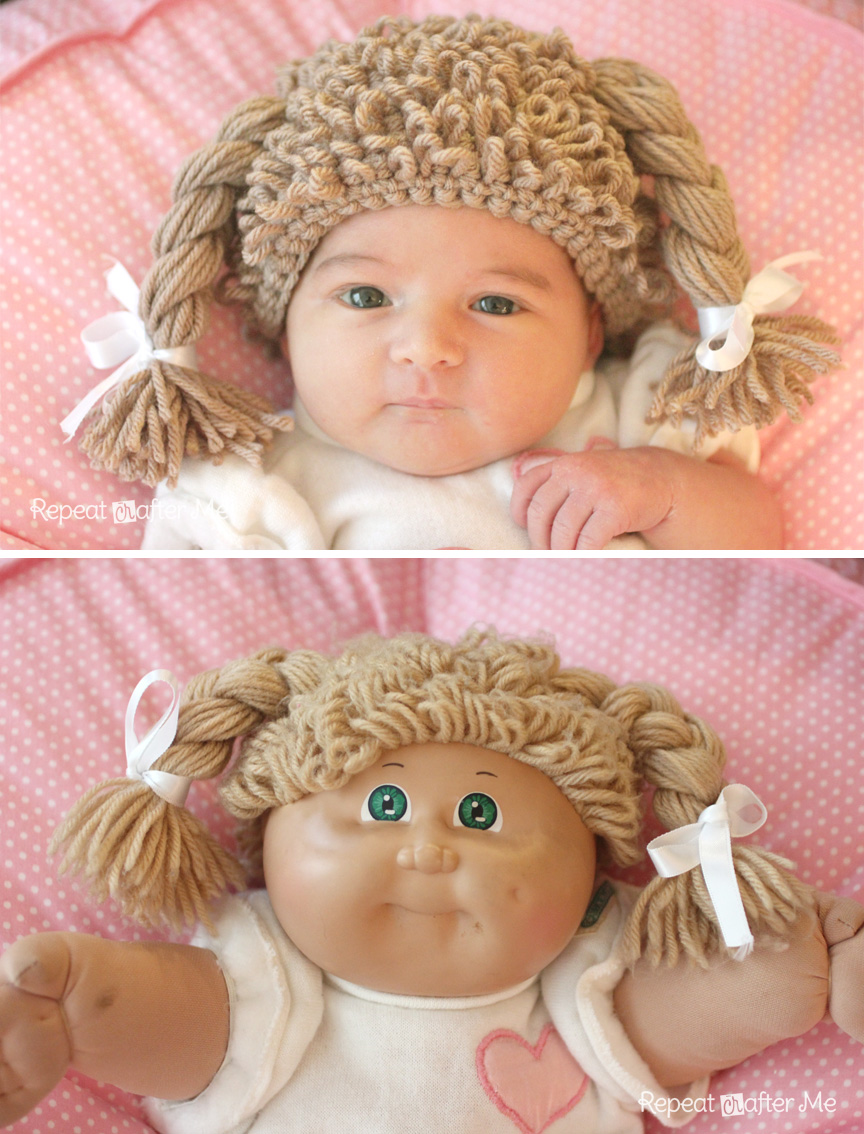
months ago I came across THIS crochet cabbage patch doll hat
pattern. And about the same time my mom found my old
cabbage patch doll that she gave me when I was 4 years
old! I knew I was going to have to pass the doll down to my newborn daughter AND
make her a matching cabbage doll hat. It is perfect for a Halloween
costume!
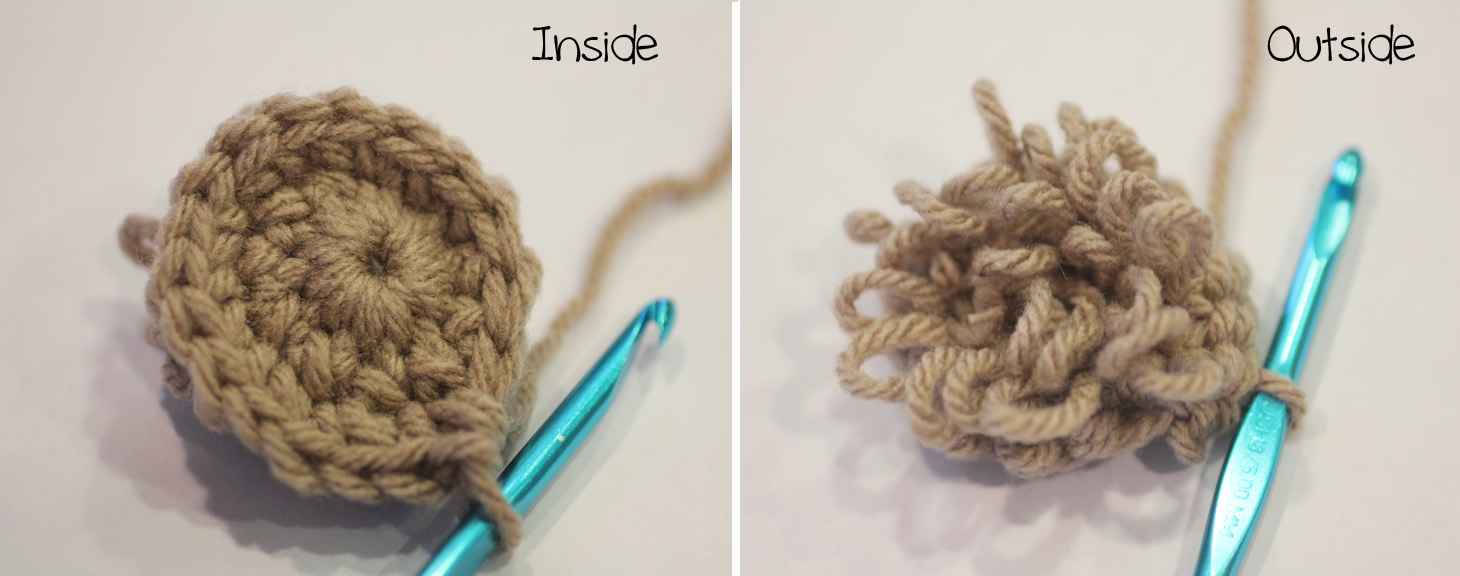
First I need to introduce you to the Loop Stitch. The entire hat
will be made with this stitch so if you aren't familiar with it, here is a
little tutorial on how to make this stitch:

Step 1: Insert hook in stitch.
Step 2:
Hook yarn around the backside of both strands of the loop around your
finger.
Step 3: Pull both strands through stitch. You now have 3 loops on
your hook and one large loop sticking out the back of the stitch.
Step 4:
Adjust your loop by pulling it to be a little smaller (if you want)
Step 5:
Yarn over and pull through all 3 loops on hook.
Step 6: You have completed
one Loop Stitch
And here is a little video. I apologize for the poor
quality :|
When the hat is
complete you will want to flip it inside out so the loops are on the
outside.
Materials:
- Worsted Weight
Yarn. I used Loops
& Threads Impeccable in Soft Taupe.
- Size H
Crochet Hook
- Tapestry Needle
- White
Ribbon
- Stitch Marker
Abbreviations:
Magic
Ring Tutorial
SC = Single Crochet
Lp St =
Loop Stitch
Cabbage Patch Doll
Hat Pattern
Size: 0-3 Months
Magic ring, chain 1, make 11 SC in ring,
continue to crochet in rounds
Round 2: Make one
loop stitch in each stitch around (11 loop stitches)
Round 3: 2 Lp St in each
stitch around (22 Lp St)
Round 4: Lp St in each stitch around (22 Lp
St)
Round 5: 2 Lp St in first stitch, Lp St in next stitch, repeat around (33
Lp St)
Round 6: Lp St in each stitch around (33 Lp St)
Round 7: 2 Lp St in
first stitch, Lp St in next 2 stitches, repeat around (44 Lp St)
Round 8-16:
Lp St in each stitch around (44 Lp St)
Add more rows if you feel it is
needed. I kept mine short so it would sit up higher on her forehead.
Fasten
off and weave in ends.
I haven't tested larger sizes but this is how I
would increase:
Note: if hat
starts to look skinny/pointy add a row of loop stitches between each increase as
you did in the beginning of the pattern
Magic starts to look skinny/pointy add a row of loop stitches between each increase as
you did in the beginning of the pattern
ring, chain 1, make 11 SC in ring, continue to
crochet in rounds
Round 2: Make one loop
stitch in each stitch around (11 loop stitches)
Round 3: 2 Lp St in
each stitch around (22 Lp St)
Round 4: Lp St in each stitch around (22
Lp St)
Round 5: 2 Lp St in first stitch, Lp St in next stitch, repeat
around (33 Lp St)
Round 6: Lp St in each stitch around (33 Lp
St)
Round 7: 2 Lp St in first stitch, Lp St in next 2 stitches, repeat
around (44 Lp St)
Round 8: 2 Lp St in first stitch, Lp St in next 10,
repeat around (48 Lp St)
(stop increasing here for 3-6 month size and
continue loop stitch in rounds until you have 17 rows)
Round 9: 2
Lp St in first stitch, Lp St in next 11, repeat around (52 Lp St)
(stop
increasing here for 6-9 month size and continue loop stitch in rounds until you
have 18 rows)
Round 10: 2 Lp St in first, Lp St in next 12, repeat
around (56 Lp St)
(stop increasing here for 9-12 month size and continue
loop stitch in rounds until you have 19 rows)
Round 11: 2 Lp St in
first, Lp St in next 13, repeat around (60 Lp St)
(stop increasing here for Toddler/Preschooler size and continue loop stitch in
rounds until you have 20 rows)
Round 12: 2 Lp St in first, Lp St
in next 14, repeat around (64 Lp St)
(stop increasing here for Child size
and continue loop stitch in rounds until you have 21 rows)
Round
13: 2 Lp St in first, Lp St in next 15, repeat around (68 Lp St)
(stop
increasing here for Adult size and continue loop stitch in rounds until you have
22 rows)
Feel free to make hat as long or as short as you like. I like to
keep mine short so it sits higher up on the forehead.
Braided
Pigtails:
Cut 35 strands of 20 inch long yarn. Fold in half and tie Pigtails:
another piece of yarn tightly to the middle point of your yarn strands. Use
tapestry needle to sew onto sides of hat. Braid and tie ends with a white
ribbon.


***
You may make and sell products from my patterns but if you do I ask that you
link back to my post. Please do not copy and post this pattern and claim it as your own. Please do not
re-publish photos as your own.***
You may make and sell products from my patterns but if you do I ask that you
link back to my post. Please do not copy and post this pattern and claim it as your own. Please do not
re-publish photos as your own.***
Want
more free patterns? Keep in touch
on my Repeat Crafter Me Facebook
Page for new pattern sneak peeks and when they will be available on my
blog!
引用
http://www.repeatcrafterme.com/2013/09/crochet-cabbage-patch-doll-inspired-hat.html
全站熱搜

 留言列表
留言列表